GPU Ray Tracing with Raycore


Ray Tracing on the GPU
In this tutorial, we'll take the ray tracer from the previous tutorial and port it to the GPU using KernelAbstractions.jl and a GPU backend of choice (CUDA.jl, AMDGPU.jl, OpenCL.jl, OneApi.jl, or Metal.jl). We'll explore three different kernel implementations, each with different optimization strategies, and benchmark their performance against each other.
By the end, you'll understand how to write efficient GPU kernels for ray tracing and the tradeoffs between different approaches!
Setup
To run things on the GPU with KernelAbstractions, you need to choose the correct package for your GPU and set the array type we use from there on.
Ready for GPU! We have:
Raycorefor fast ray-triangle intersectionsKernelAbstractionsfor portable GPU kernels (works with CUDA, AMD, Metal, oneAPI, and OpenCL)BenchmarkToolsfor performance comparison
Part 1: Scene Setup (Same as CPU Tutorial)
Let's use the exact same scene as the CPU tutorial - the Makie cat with room geometry:
Scene loaded: 6014 triangles, 6 materials
Part 2: GPU Kernel Version 1 - Basic Naive Approach
The simplest GPU kernel - one thread per pixel:
The trace_gpu function is a universal launcher that works with any of our kernels. It handles the backend-specific setup automatically using KernelAbstractions.jl:
Key KernelAbstractions.jl concepts:
Backend detection:
get_backend(array)automatically determines if we're using CPU, AMD GPU, NVIDIA GPU, etc.Kernel compilation:
kernel(backend)compiles the kernel for the specific backendWorkgroup configuration: Optional
tilesizeparameter controls thread organizationThread indexing: Inside kernels, use
@index(Global, Linear)or@index(Global, Cartesian)to get thread IDsSynchronization:
synchronize(backend)ensures all GPU work completes before continuing
Let's test kernel v1 on the CPU (yes, they always work with normal Arrays):

To run things on the GPU, we simply convert the arrays to the GPU backend array type. to_gpu is a helper in Raycore to convert nested structs correctly for the kernel. It's not doing anything special, besides that struct of arrays need to be converted to device arrays and for pure arrays GPUArray(array) is enough.

First GPU render! This is the simplest approach - one thread per pixel with no optimization.
Part 3: Optimized Kernel - Loop Unrolling
Loop overhead is significant on GPUs! Manually unrolling the sampling loop eliminates this overhead:

This eliminates branch overhead from loop conditions
Reduces register pressure
Better instruction-level parallelism
1.39x faster than baseline!
Part 4: Tiled Kernel with Optimized Tile Size
The tile size dramatically affects performance. Let's use the optimal size discovered through benchmarking:

Tile size matters! With (32, 16) tiles, this kernel is 1.22x faster than baseline. With poor tile sizes like (8, 8), it can be 2.5x slower!
Part 5: Wavefront Path Tracing
The wavefront approach reorganizes ray tracing to minimize thread divergence by grouping similar work together. Instead of each thread handling an entire pixel's path, we separate the work into stages. Discussing the exact implementation is outside the scope of this tutorial, so we only include the finished renderer here:
Let's benchmark the wavefront renderer on both CPU and GPU:

Wavefront benefits:
Reduces thread divergence by grouping similar work
Better memory access patterns
Scales well with scene complexity
Enables advanced features like path tracing
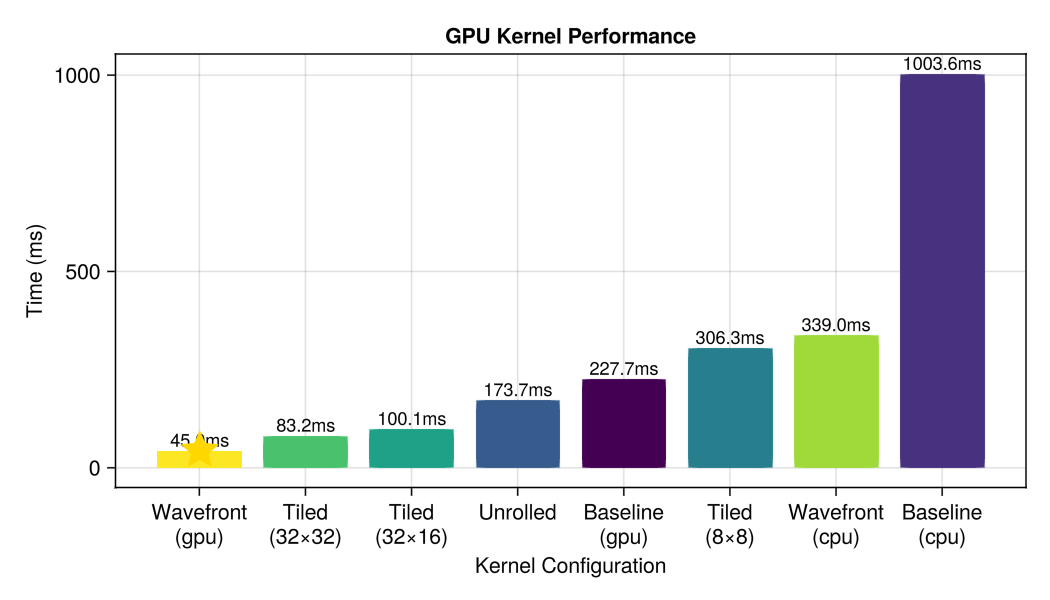
Part 6: Comprehensive Performance Benchmarks
Now let's compare all kernels including the wavefront renderer:
Next Steps
Add adaptive sampling (more samples only where needed)
Explore shared memory optimizations for BVH traversal
Implement streaming multisampling across frames